Resources

CattleVR is a Virtual Reality Training Experience that helps train people on
cattle flight zones and learn how to move cattle safely through the yards.

User Support

CattleVR is an immersive VR training app designed to teach safe cattle handling.

Ideal for staff and students, CattleVR covers flight zones, moving cattle, and drafting procedures. CattleVR addresses the lack of large animal experience among students and safety concerns from teachers.

CattleVR offers a realistic, safe, and economical alternative to live animal practice, making it a vital tool for innovative and effective animal handling education.


Getting Started with the VR Headset

  1. Headset Preparation: Ensure students understand how to properly wear the VR headset. They should first position the headset over their eyes, then adjust the head strap for a secure fit. If students wear glasses, these should be comfortably accommodated by the headset.
  1. Using the Hand Controllers: Place the hand controllers in the students’ hands. Secure them with the wrist straps to avoid accidental drops. Show them how to grip the controller and tighten the strap.
  1. Instructor’s Role: As an instructor, it’s important to ground the students in reality while they are immersed in the VR experience. A gentle hand on the student’s shoulder can provide comfort and orientation.
 

Navigating the VR Environment

  1. Movement Practice: Guide the students through basic movement exercises using the hand controllers. They should practice moving forward, backward, and turning around to gain familiarity with the controls.
  1. Flight Zone Interaction: Introduce the concept of the flight zone, represented by an inner and an outer circle. Have the students move to the left and right to understand the concept of navigating around the flight zone. Ensure they can rotate to view the full 360° environment.
  1. Introduction Module: Once students are comfortable with basic movements and the flight zone, they can proceed to the introduction module where they will put these skills into practice.


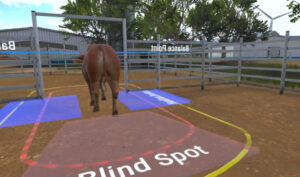
  1. Understand the Balance Point: Learn how the balance point at the shoulder of the cattle influences their movement, allowing control over their direction.
  1. Recognize the Flight Zone: Identify and utilize the flight zone to guide cattle effectively, applying appropriate pressure to encourage movement.
  1. Avoid the Blind Spot: Understand the cow’s blind spot and the importance of maintaining visibility to prevent dangerous situations.
  1. Safely Move Cattle: Apply the principles of balance point and flight zone to safely guide cattle through tasks like moving them through a gate.
  1. Manage Pressure: Practice stepping into and out of the flight zone to control cattle movement without causing stress or fear.
  1. Self-Correct Positioning: Develop the ability to self-correct and adjust positioning to ensure effective and safe cattle handling.
 

These outcomes ensure that students can confidently and safely handle cattle, applying real-world techniques in a virtual environment.

Current Modules

Practice the basics of bovine handling and VR movement. Teleport into the appropriate zones to move the bull into the adjacent yard.

In this module you will learn

  • The basics of flight zones
  • How the animal responds to you
  • Understand how to move cattle safely in the yard
 

Starting the Introduction Module

   Entering the Module:

  • Direct students to click on the “Introduction Module” icon on the screen. Upon entering, they will immediately encounter the Droughtmaster bull. Their first task is to orient themselves by turning around to read the information board, which provides essential instructions for the module.
 

Learning the Balance Point

   Understanding the Balance Point:
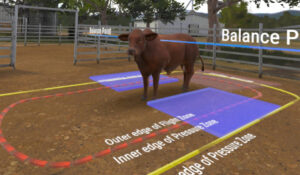
  • Balance Point Location: Explain that the balance point is located at the shoulder of the animal. This is crucial for controlling the movement of the animal.


  • Animal Movement: When students position themselves behind the balance point, the animal will move forward. Conversely, if they stand in front of the balance point, the animal will move backward. Additionally, when students are in front of the balance point, the cow will turn to face them. This interaction is key for effectively managing cattle movement within the flight zone.
 

Exploring the Blind Spot

   Blind Spot Awareness:

  • Visual Range: Cows can see in a 330° radius around them. However, when a student enters the blind spot directly behind the cow, a yellow exclamation mark will appear, indicating that the cow can no longer see them.
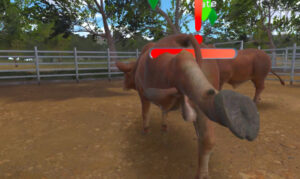
  • Danger Zone: As students move closer behind the animal, the exclamation mark turns red, warning of a higher risk. If the student remains in this position for too long, they may get “kicked” by the virtual animal, simulating a real-life scenario. Emphasize that this is a dangerous situation in actual practice, and students should avoid it.
 

Practicing Movement in the Flight Zone

   Positioning for Movement:

  • Proper Positioning: Instruct students to move to the side of the animal, focusing on the balance point at the shoulder. They should work between the shoulder and the hip of the animal, never going further back than the hip.
  • Angle of Approach: Students should face 45° towards the shoulder, aligning with the blue line that touches the cow’s wither. By walking in at this angle, the cow will move away from them. This action effectively utilizes the flight zone.
 

   Releasing Pressure:

  • Pressure Management: Teach students the importance of releasing pressure after influencing the animal’s movement. Once the cow begins to move, students should step back to reduce pressure, ensuring the animal does not feel threatened or scared. This process should be repeated until students feel confident in entering the flight zone, affecting the animal’s behavior, and then safely releasing pressure.


Transition to the next module

   Completing the Exercise:
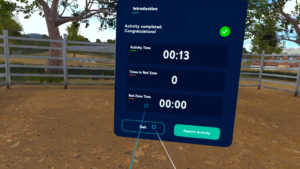
  • After successfully guiding the animal through the gate, students will be ready to move on to the next module. Remind them that the skills practiced in this module are foundational and will be applied in subsequent exercises.


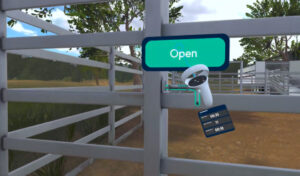
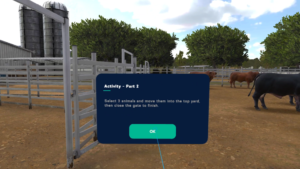
First you must reach the other side of the yard and open the gate. Then move three animals into the top yard, then close the gate to finish.

In this module you will learn

  • Opening gates
  • Moving multiple cattle at a time
  • Flights zone (without diagram)
  • Getting kicked if in the blind spot
 

Entering The Module

       Starting the Module:
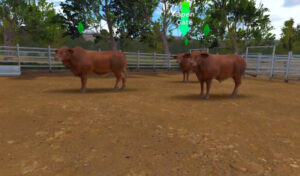
  • Students should navigate back to the home screen and select the module Upon entering, they will see an instruction board outlining the learning objectives. Encourage students to read these instructions carefully before beginning.


Executing the Task

     Opening the Gate:

  • Students need to walk around the cattle, checking their positions, before approaching the gate. Emphasize the importance of staying aware of the cattle’s location at all times. Students must get close enough to the gate to open it, simulating real-life proximity requirements.


Moving the Cattle:

  • Instruct students to work within the cattle’s flight zone, positioning themselves between the shoulder and the hip. They should learn to identify if they are in the wrong spot and how to self-correct.


Handling Challenges:

  • If a student struggles, remind them of the basic principles from Module 1. They should move in front of the point of balance, ensure the cattle can see them, then step back and walk 45° towards the shoulder to prompt movement. Repetition is key to reinforcing learning outcomes.


Using the Yards:

  • The yards can be used strategically to move the cattle. Students should push the cattle towards the yards and then guide them through the gate. Sometimes, cattle may not cooperate, and students will need to give clear instructions, ensuring the cattle see them before moving into the flight zone.


Final Steps

   Reflection and Correction:

  • After completing the task, instructors can review the students’ performance, noting how long the task took and how often the students entered the red zone. If necessary, students can repeat the exercise to improve their technique.
 

   Closing the Gate:

  • Before finishing, students should ensure all cattle are safely in the yard and close the gate. This final step reinforces the importance of completing tasks thoroughly.

First select three bulls. Then open the gate and move the selected bulls through the gate, then close the gate to finish.

In this module you will learn

  • Drafting out specific cattle
  • Moving specific cattle with other cattle in the yard
  • Safety when in large mobs of cattle
 

First select three bulls. Then open the gate and move the selected bulls through the gate, then close the gate to finish.

IT Support

CattleVR is a privately listed application available on Meta and Vive devices, with Pico coming soon.

We can use any of the above manufacturers own app stores for deployment as well as services such as ManageXR and ArborXR.

 
Notion Image
 
Notion Image
 
Notion Image
 
Notion Image
 
Notion Image

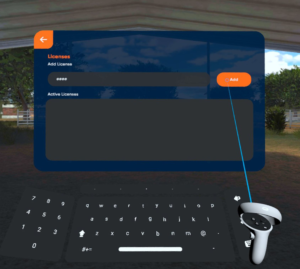
Now that you have installed CattleVR and have been provided your licence key, simply follow the steps below to unlock the CattleVR experiences.
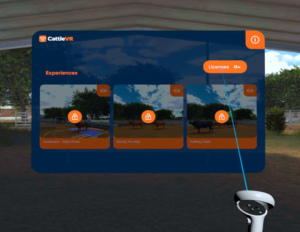
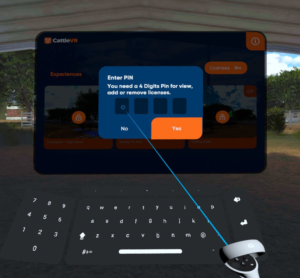
 
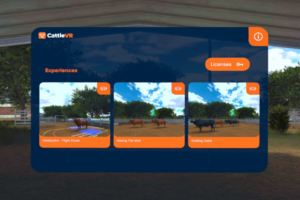
  1. Open CattleVR and select “Licences” from the landing page.


  1. Enter the 4 digit Admin Pin (1990) to access the “Licences” page.


  1. Enter your provided licence code into the “Add Licence” section and select the “Add” button.


  1. A window will appear, advising the code has been accepted or was incorrect. Once the code is accepted, simply return to the landing page, your newly available content will be unlocked and waiting.


Why should you cast to an external screen?

Casting the VR headset to an external screen offers significant benefits, particularly in an educational setting like CattleVR. When the instructor casts what the student sees onto an external screen, it enhances the learning experience for everyone involved.
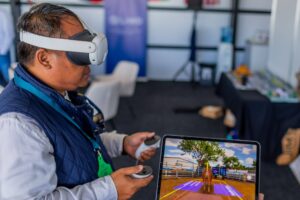
  1. Real-Time Guidance: By casting the VR experience to an external screen, instructors can monitor what the student is seeing and doing in real-time. This allows for immediate feedback and guidance, ensuring that the student stays on track and understands the learning objectives.
  1. Collective Learning: Other students in the room can observe the VR session on the screen. This shared experience fosters collaborative learning, as they can learn from both the actions and mistakes of their peers. It also allows for group discussions and reinforces key concepts as the entire class can see and understand the actions being performed.
  1. Enhanced Comfort and Support: When students are in a VR environment, they can sometimes feel disoriented or lose touch with their physical surroundings. By casting to the screen, the instructor can maintain a connection with the student by providing verbal cues and physical reassurance, such as a hand on the shoulder. This helps the student feel more grounded and supported.

How-to

Casting your devices can vary between devices and your network setup. You can use the below links to find the relevant casting methods depending upon your headset manufacturer.

If the below linked methods do not work, it is advised to contact your IT Admin for further assistance.